Step 5: End Screen |
  
|
Step 5: End Screen |
|
End Screen
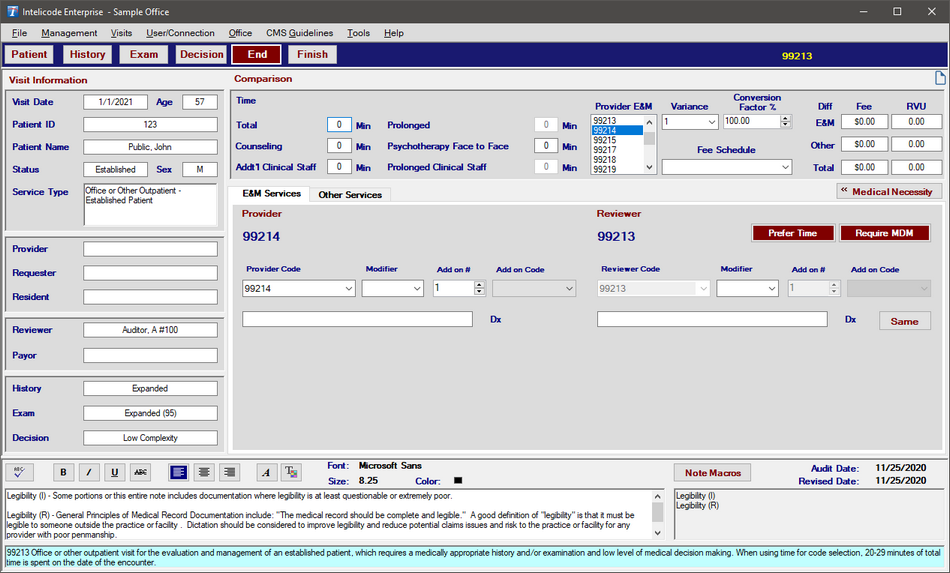
The End screen displays a cumulative total of all information entered up to this point in the audit. It is advisable to check the information entered thus far to ensure accuracy.
1.The Visit Information section displays a summary of the information entered on the previous screens.
2.The Comparison section is where you can enter time and view the Reviewer E & M (audited code) and the Provider E & M (code billed by the provider). It also displays the Fee Schedule (if any) used and the total difference in dollars and RVUs and the level of variance from the audited code.
i.The Time section is used to include time documented for an encounter. Some codes may require counseling time in addition to the service’s time (Face-to-Face, Non-Face-to-Face, or Total Time) in order to use time to determine the code. Psychotherapy Face-to-Face and Clinical Staff Face-to-Face are used to achieve add-on codes.
a.For some codes, generally those noting a typical time, the code may be met using time if counseling and/or coordination of care dominates the service.
b.Click on the text box and type the appropriate time for each field.
c.We did not enter a Face to Face time or a Counseling time (see image below).
ii.To select the Provider E & M, simply scroll down the list of E & M Codes provided and click on the code billed by the provider being audited.
iii.Intelicode® will then do a comparison between the Reviewer E & M and the Provider E & M to produce a difference (if any) in the dollar amounts billed and the variance level.
iv.We chose the Provider E & M of 99214 for our audit (see image below).
v.The encounter had a Variance of "1"
3.The Note Macros field gives the reviewer the ability to document specific information about an audit, encounter, documentation issue, etc.
i.Note Macros can be developed (see Note Macros for help) to insert in the Note Macros field or the reviewer may type their own text into the Notes field as desired.
ii.The Note Macro(s) will show in both the handwritten Notes (left side) and in the Note Macros (right side). This allows you to edit the Note Macros if necessary.
iii.The handwritten (left) side will be shown on the Encounter Detail Report automatically as well as the Audit Summary and Custom Provider Accuracy Reports if the option With Notes is selected from the Report Options.
iv.The Note Macros (right) side will only show on the Issues and Recommendations Report. This is to maintain integrity of the Note Macros.
v.This aspect of Intelicode provides the reviewer with the ability to enhance their audit reporting without a lot of additional work.
vi.For our audit (see image below), we inserted a Note Macro we developed called "Legibility". We developed an Issue macro and a Recommendation macro.
vii.The Issues macro explains what the documentation issue is and the Recommendation macro gives the recommended steps to improve that issue.
4.The Medical Necessity questions allow the user to override the Reviewer E & M by setting the Medical Decision Making Level as the key component in determining the level of service.
i.The first question determines whether or not you want to override the Reviewer E & M.
ii.If you answer the first question "N", the second question becomes available.
iii.The second question asks if you want to manually override the Reviewer E & M.
iv.If you answer "Yes", you are given a list from which you can select the desired code. The third question is not necessary.
v.If you answer "No" to the second question, the third question becomes available.
vi.The third question asks if you want to base the Reviewer E & M on the MDM.
vii.If you answer "Yes" to the third question, the Reviewer E & M changes accordingly.
viii.If you answer "No" to the third question, no change is made to the data.
ix.If either the second or third question is "Yes", the program will place a "-DC" modifier with your audit identifying that the code has been determined by the Medical Decision Making Level of service.
5.Diagnosis Codes/Procedure Codes
i.The Same as Provider button for Procedures and the Same button for Diagnosis will set the Procedures and/or the Diagnosis equal between Provider and Reviewer.
ii.Any modifiers that need to be added can be done with the drop down arrows on the right side of each Procedure Code.
iii.When a modifier is added, it appears below next to a blue oval.
iv.To delete a modifier, click on the blue oval. These are the same steps to take to add and remove a diagnosis as well.
6.Prefer Time
i.The Prefer Time button should be selected to prefer a time-based code when counseling time dominates the encounter. If this is not selected, a higher code may be met based on History, Exam, and Decision levels.
ii.This can be enabled by default from the Preferences menu.
7.Require MDM
i.The Require MDM button should be selected when your practice requires that one of the two components needed must be MDM.
ii.This can be enabled by default from the Preferences menu.
Copyright © 1998-2026 Technology Solutions, Inc. All rights reserved.
INTELICODE® is a registered trademark of Technology Solutions, Inc. (TSI). All Rights Reserved.