Report Options |
  
|
Report Options |
|
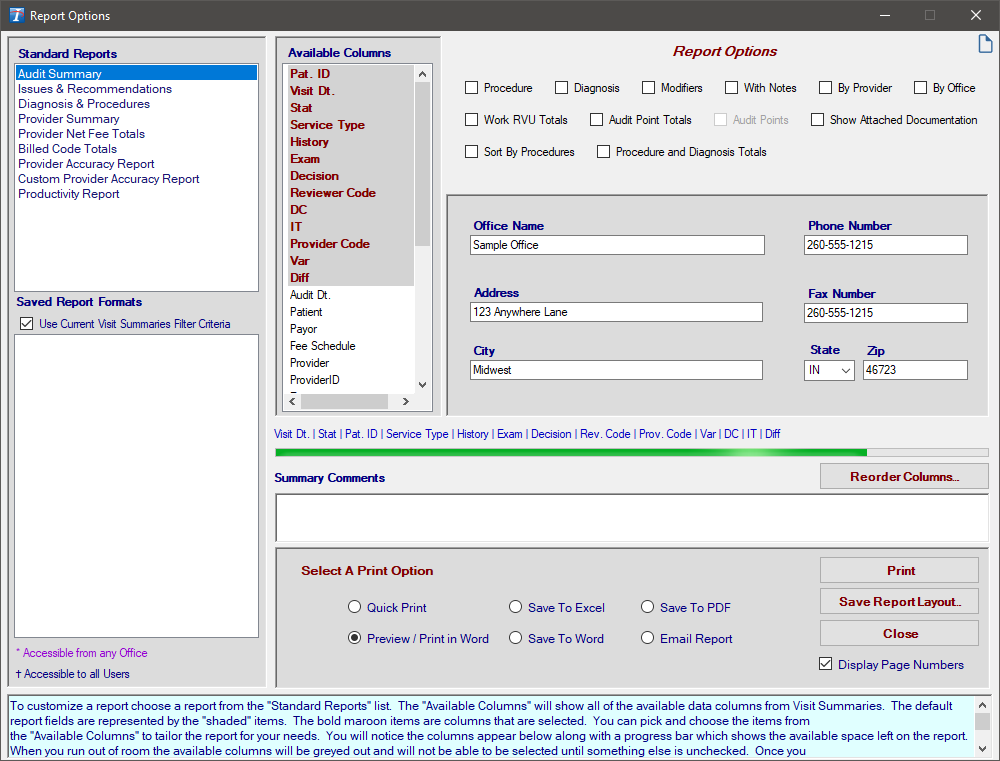
When printing various reports from the Visit Summaries screen, you will be presented with this dialogue. Report Options gives you choices about what report to print, how you choose to have the data listed, how you want to print (or "export") the report, and now, for certain reports, you can even choose which columns you want in the report.
1.Choose Visit Summaries from the Visits menu at the top of the screen.
2.Choose the criteria you wish to report by (i.e. Status, Service Category, Provider, etc.). Select as many as you deem necessary to achieve the results you are looking for. This will filter the information to suit your needs. In our example below, we chose "Dr. Farthington" from the Provider list.
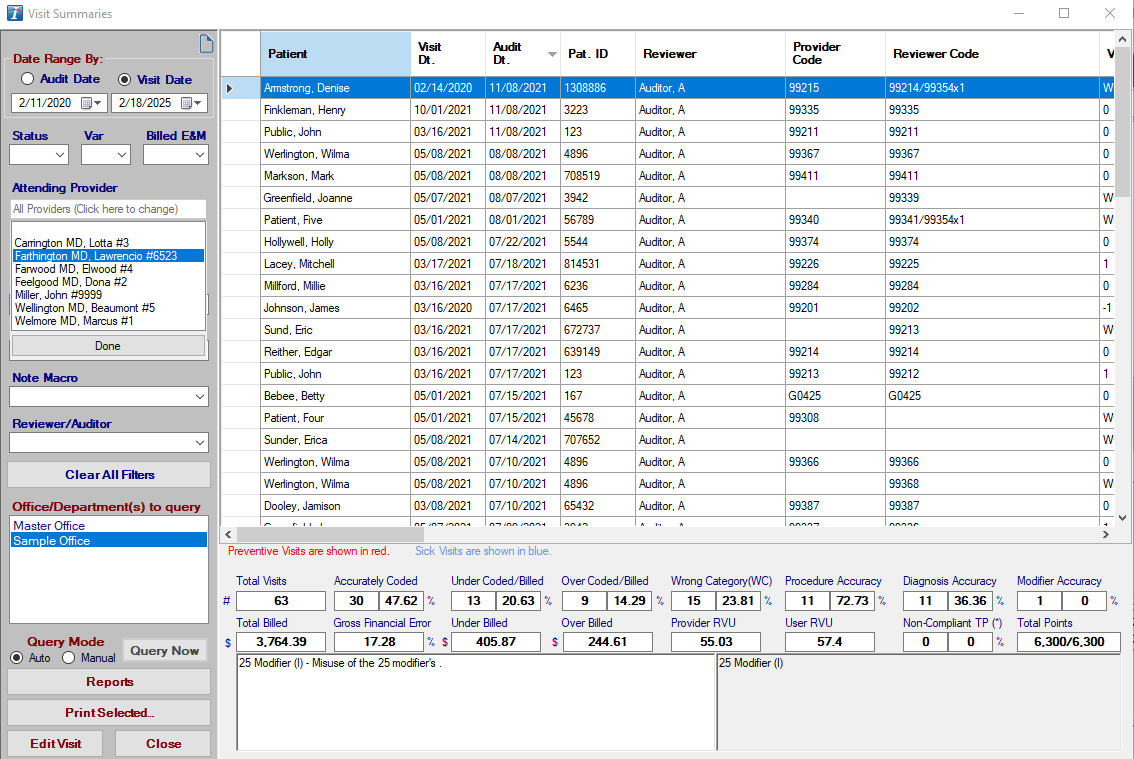
3.If you are going to print an Audit Summary or a Custom Provider Accuracy Report, choose what columns you want available for the report by right-clicking anywhere on the grid and clicking Select Grid Columns. For the other reports, the columns are fixed and cannot be changed.
4.For the Audit Summary and the Custom Provider Accuracy Report, you can determine the order in which the columns will appear on the report. To change the position of a column, click on its heading and drag it to the location that you desire. Repeat this procedure with other columns until you have the column order you are looking for.
5.Choose which office(s) you want to report on by selecting the appropriate office(s) located in the white box just below the Office/Department(s) to query heading. Select multiple offices by holding down the Ctrl key or the Shift key.
6.When you have the desired data set in the grid, click on the Reports button in the lower-left portion of the screen. The Report Options screen will pop up.
7.Standard Reports:
a.Located in the upper-left portion of the screen, the Standard Reports section lists the various standard reports that are available in Intelicode®.
b.To select a standard report, click on its title in the box. Notice that there are different options available for different reports. For example, for two of the reports (Audit Summary and Custom Provider Accuracy Report) you are able to choose which columns are in the report, a feature new to Intelicode®.
c.Once you have selected your Standard Report, you can then begin to select your settings for the report.
8.Saved Report Formats:
a.Located in the bottom-left portion of the screen, the Saved Report Formats are used to create reports using the same settings as a previous report.
b.The Use Saved Report's Filter Criteria option can be used to select the filters that were user when creating the Saved Report Format.
i.This affects all filters except for date and office selections.
ii.The Include Provider Filters option allows you to include or exclude the saved provider filters from the Use Saved Report’s Filter Criteria option.
c.The Use Saved Report’s Column Order option can be used to use the same column order that was used when creating the Saved Report Format.
9.Available Columns:
a.A list of Available Columns can be utilized for the Audit Summary and the Custom Provider Accuracy Report.
b.The columns that are currently selected for the report have a bold, maroon font.
c.The columns that are within a gray background are the default columns.
d.The columns that have a normal black font are available to add to the report. Simply click on the column name to add it.
e.The columns that have a light gray font are not available due to lack of space. You would need to remove a column (or more) from the report to make more room.
f.The order in which the columns will appear on the report is shown in blue text just below the Available Columns. To change the order of the columns, see the instructions above (#4).
g.To add a column to the report, click on its text. It will now have a bold, maroon font.
h.To remove a column from the report, click on a column name that has a bold, maroon font. It will be removed from the report. Its text changes to a normal black font.
10.Column Gauge:
a.Notice the long bar just below the Available Columns going across much of the page. This is the Column Gauge.
b.The green bar represents how much page space is taken up by the current columns in the report.
c.The current active columns are shown in order just above the gauge.
d.As you add or remove columns, the bar lengthens or shortens accordingly, letting you know how much more width is available on the report.
11. Miscellaneous Columns:
a.The Audit Summary and the Custom Provider Accuracy are the only ones with Available Columns and each column adds something different.
b.Pat ID: This adds the Patient ID into the Report.
c.Visit Dt: This adds the Visit Date into the Report.
d.Stat: This adds the Status of the Patient into the Report.
e.Service Type: This adds the Service Type of an audit into the Report.
f.History: This adds the History level obtained for an audit in the Report.
g.Exam: This adds the Exam level obtained for an audit in the Report.
h.Decision: This adds the Decision level obtained for an audit in the Report.
i.Reviewer Code: This adds the Reviewer Code achieved in an audit in the Report.
j.DC: This is otherwise known as Determined Code (DC) and shows DC when Medical Necessity was used to alter the Reviewer Code.
k.IT: This is otherwise known as Incident To (IT) and shows either Y or N depending on if IT was met or not in an audit.
l.Provider Code: This adds the Provider Code achieved in an audit in the Report.
m.Var: This adds the Variance, including 0, achieved in an audit in the Report.
n.Diff: This adds the Difference achieved in an audit in the Report.
o.Audit Dt: This adds the Audit Date into the Report.
p.Patient: This adds the Patient Name to the Report.
q.Payor: This adds the Payor to the Report.
r.Fee Schedule: This adds the Fee Schedule to the Report.
s.Provider: This adds the Attending Provider Name to the Report.
t.Reviewer: This adds the Reviewer Name to the Report.
u.TP: This is otherwise known as Teaching Physician (TP) and shows GE, GC, or * depending on how the Teaching Physician Guidelines were answered.
v.Resident: This adds the Resident Name to the Report.
w.Specialty: This adds the Specialty/Subspecialty to the Report.
x.Requester: This adds the Requesting Provider Name to the Report.
y.ProviderRVU: This adds the Provider RVU to the Report.
z.UserRVU: This adds the Reviewer RVU to the Report.
aa.DOB: This adds the Date of Birth to the Report.
ab.Diagnosis Total: This adds the Diagnosis Total number for each audit in the Report.
ac.Diagnosis Accurate: This adds the Diagnosis Accurate number for each audit in the Report.
ad.Office: This adds the name of the Office in the Report.
ae.Points: This adds the Visit's Audit Points to the Report.
12. Miscellaneous Options:
a.Each report has a different set of miscellaneous options available for output.
b.The miscellaneous options for a particular report are shown with check boxes toward the top of the screen.
c.To add or remove a particular item from your report, check the box by clicking on it or on the text itself.
d.Diagnosis / Procedure / Modifiers:
i.The Diagnosis, Procedure, and Modifiers options are available only for the Audit Summary and the Custom Provider Accuracy Report.
ii.When the Procedure box is checked, the report will list each procedure for each encounter.
iii.When the Diagnosis box is checked, the report will list each diagnosis for each encounter.
iv.When the Modifiers box is checked, even if the Procedure box is not checked, each modifier will be shown with its corresponding procedure.
e.With Notes: This option, if enabled, simply designates whether or not the notes will be present on the report.
f.By Provider: This option, if enabled, sorts the encounters By Provider in alphabetical order. The Provider is shown on the report in a large heading prior to the encounter pertaining to that provider.
g.With Graph: This option, if enabled, will place in the report a graph of the current data.
h.Work RVU Totals: This option, if enabled, will place the Totals of the Work RVUs in the Summary of the Report.
i.Audit Point Totals: This option, if enabled, will place the Totals of the Points achieved in the Summary of the Report.
j.1 Signature Line: This option, if enabled, will place one (1) Signature Line at the end of the Report.
k.2 Signature Lines: This option, if enabled, will place two (2) Signature Lines at the end of the Report.
l.Include “Other” Note Macros: This option, if enabled, will include “Other” Note Macros on the Issues And Recommendations Report.
m.Work RVUs: This option, if enabled, puts in the total Provider and Reviewer (User) RVUs into the Report inside the Summary for each Provider.
n.Audit Points - This option, if enabled, puts in the total Points for each Provider into the Report inside the Summary for each Provider.
o.Diffs: This option, if enabled, will place a Diff column in the Report and will also give a total at the end of the Report.
p.Show Attached Documentation: This is only on the Audit Summary report and will allow all visits with documents attached via InteliNote to show. For info about InteliNote see InteliNote.
q.Sort By Procedures: Sort visits based on the E&M codes and codes entered under Other Services.
r.Procedure and Diagnosis Totals: Include procedure and diagnosis totals and accuracy on the Audit Summary report.
s.Additional Statistics: Include E/M accuracy and allow additional options on the Custom Provider Accuracy report.
t.Modifier Statistics: Include Modifier accuracy and totals on the Report.
13. Office Information:
a.This section is located on the right side of the screen, almost midway down the page.
b.Here you can set various general information (i.e. Office Name, Address, Phone Number, etc.) about your office.
c.This information will appear in the header of the first page of every report.
d.The information will be as you left it each time you enter the Report Options screen.
14. Summary Comments:
a.If you would like to make some summarizing comments that will appear toward the end of your report, type your comments in the white box just below the Summary Comments heading.
b.If there are comments that you would like to show repeatedly on a report, you save a report layout by clicking on the Save Report Layout button in the Print Options section below. The comments that are in the box at the time you saved the report layout will appear every time you use that report layout.
15. Print Options:
a.The Print Options section is at the bottom of the Report Options page. This is the same selection tool as the Print Options window that comes up when running reports from other screens.
b.Select a Print Option:
i.Select a Print Option by clicking on the circle next to the option you prefer, or you can click on the text itself. Only one option can be active at a time.
ii.If you do not have Microsoft Word installed on your machine, the Send To Word, Send to PDF, and Email Report options are disabled and cannot be used. The same is true for the Send To Excel option if you do not have Microsoft Excel installed on your machine.
iii.When the Preview in Word option is selected and the Print button is clicked, the application associated to open a .docx file will start and open your report. Once open you can edit, print, save from your application, if available. At any time you can return to the Report Options screen. Preview in Word is the default setting.
iv.When the Quick Print option is selected and the Print button is clicked, a single copy of the report will be printed to your default printer.(requires an application to be associated for a .docx file to be able to print)
v.When the Send To Excel option is selected and the Print button is clicked, the report is sent to a Microsoft Excel file and you are then given the opportunity to name the file and save it to the location of your choice.
vi.When the Send To Word option is selected and the Print button is clicked, the report is sent to a Microsoft Word file and you are then given the opportunity to name the file and save it to the location of your choice.
vii.When the Send To PDF option is selected and the Print button is clicked, the report is sent to an Acrobat PDF file and you are then given the opportunity to name the file and save it to the location of your choice.
viii.When the Email Report option is selected and the Print button is clicked, a new email is brought up with your report file attached to the email.
ix.Click Print to print the report. This will also print any documents you have attached via InteliNote. If you have questions about InteliNote see InteliNote.
c.If the layout of the current report and the filters from visit summaries screen is something that you would like to use again, click on the Saved Report Layout button. Type a significant name and click OK.
d.When you are finished with the Report Options screen, click the Close button.
Copyright © 1998-2026 Technology Solutions, Inc. All rights reserved.
INTELICODE® is a registered trademark of Technology Solutions, Inc. (TSI). All Rights Reserved.