Visit Summaries |
  
|
Visit Summaries |
|
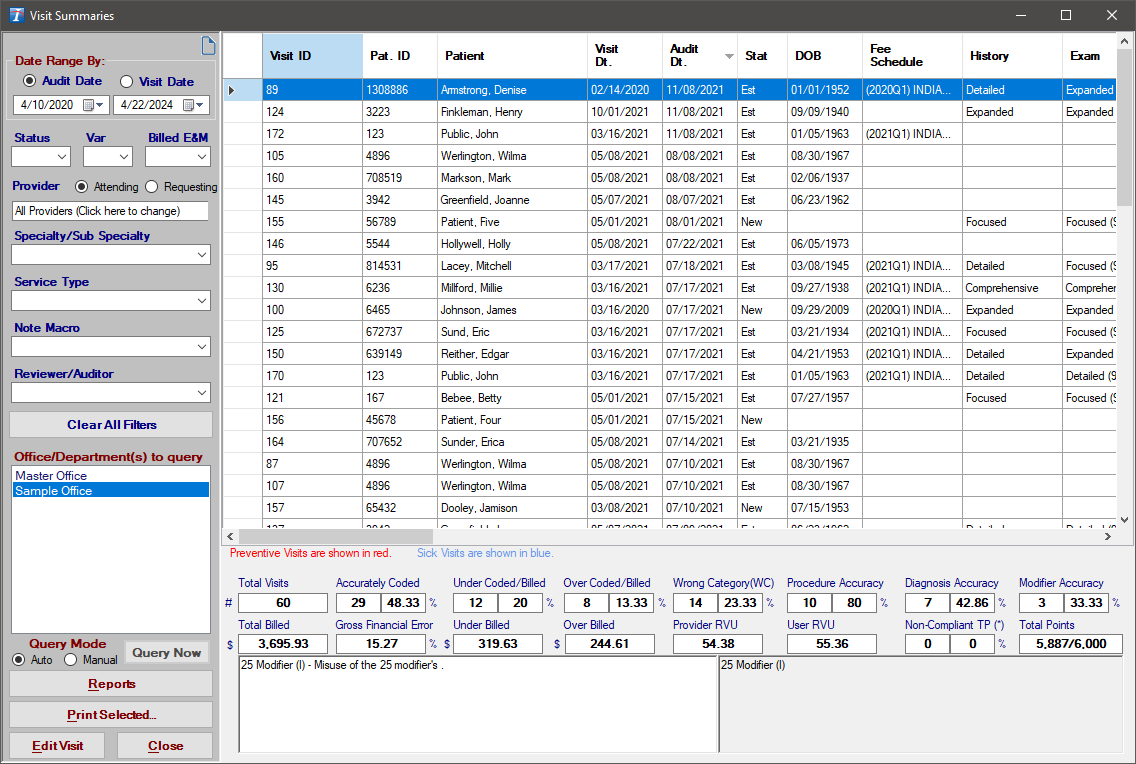
The Visit Summaries screen displays the audited encounters for selected office(s). You may sort by using no filters, one filter, or multiple filters at the same time. The information displayed on this screen can be sorted in multiple ways to make your reports as specific as you desire.
1.To access the Visit Summaries screen, click on the Visits menu at the top of the screen. Then, click on Visit Summaries.
2.Offices:
a.Notice first, the lower-left portion of the screen. There is a white box beneath the heading that says Office/Department(s) to Query. The office that is selected is the office that is being used to display the data in the grid on the right side of the screen.
b.To switch to another office, click on the office name.
c.To display data from multiple offices, hold down Ctrl key and select other offices. You can also hold down the Shift key to select a group of offices at one time.
3.Grid:
a.Visits:
i.Each row in the grid is a visit.
ii.You can select a visit by clicking on it. You can select multiple visits by holding down the Ctrl key as you select. You can select a group of visits at one time by holding down the Shift key while selecting.
iii.When you select a visit, the Notes associated with that encounter are displayed in the white box on the bottom left of the screen, while the Note Macros are displayed in the white box on the bottom right of the screen.
iv.To delete visit(s), select the visit or visits you wish to delete, right-click anywhere in the grid, and then click on Delete Visit(s). Otherwise, instead of right-clicking, you can simply press the Delete key on your keyboard.
v.To send visit(s) to another office, select the visit or visits you wish to send, right-click, and then click on Send Visit(s) to Another Office. Next, pick the office you want to send the visit(s) to.
vi.To edit a visit, select one visit (if you select more than one, the one you last clicked on will be edited). Then, click on the Edit Visit button towards the lower-left corner of the screen (or, you can double-click on the visit in the grid). The Patient screen will pop up with the visit selected active.
vii.To print an Encounter Detail Report on the visit(s) selected, click Print Selected. The Print Options window will pop up whereby you can print the report. For information about the Encounter Detail Report see the Encounter Detail Report help page.
b.Columns:
i.Each column in the grid is a data field.
ii.To select which columns you want in the grid, right-click anywhere within the grid and click on Select Grid Columns. You will be given a list of fields with a check box by each field.
iii.Check or uncheck fields accordingly by clicking on the checkbox next to the field name or on the field name itself.
iv.Click OK when the desired column names are checked.
v.Click Cancel to avoid any changes to the columns.
vi.To change the order in which the columns appear, click on the column heading, hold down the mouse button, and drag the box to the desired position. You can also right click on the grid and select Reorder Grid Columns. Column names can be clicked and dragged to the desired position or moved using buttons. The top to bottom column order corresponds to the left to right order.
vii.The column order can be saved or loaded from a file by right clicking on the grid and selecting Export Grid Layout to save or Import Grid Layout to load.
viii.To alter the width of any given column, use your mouse to put the cursor on the column heading bar on the line that separates the columns, hold down the mouse button, and drag the column divider to the desired position.
ix. To reset the columns to the default order and width, right-click anywhere in the grid and select Reset Grid to Default.
x.To save the current grid layout to a file, right-click anywhere in the grid and select Export Grid Layout. This allows multiple layouts to be saved, loaded, or shared with other users.
xi.To load the grid layout from a file, right-click anywhere in the grid and select Import Grid Layout.
4.Totals:
a.Total Visits: The total number of visits currently showing in the grid.
b.Accurately Coded: The number and percentage of visits currently in the grid that are coded accurately.
c.Under Coded/Billed: The number and percentage of the Total Visits that are under coded and hence underbilled.
d.Over Coded/Billed: The number and percentage of the Total Visits that are over coded and hence overbilled.
e.Wrong Category: The number and percentage of the Total Visits that were coded within the wrong category.
f.Procedure Accuracy: The number of total procedures and the percentage of which are accurate.
g.Diagnosis Accuracy: The number of total diagnoses and the percentage of which are accurate.
h.Modifier Accuracy: The number of total modifiers and the percentage of which are accurate.
i.Total Billed: The total amount billed for the visits currently showing in the grid.
j.Financial Error: The percentage of difference between the amount inaccurately billed and the total amount billed.
k.Under Billed: The total amount of the Total Billed that was under billed.
l.Over Billed: The total amount of the Total Billed that was over billed.
m.Provider RVU: Total of Provider RVUs.
n.User RVU: Total of User/Reviewer RVUs.
o.Non-Compliant Teaching: Reflects only those services (the number and percentage) that are non-Compliant teaching services, or those services that did not meet the teaching physician guidelines. (For Intelicode P.A.T.H. only)
p.Total Points: The number of achieved and possible audit points in the shown visits.
5.Filters:
a.Visit Date / Audit Date:
i.This filter will determine if the encounters displayed will be filtered by the Visit Date or by the Audit Date.
ii.The Visit Date / Audit Date filter is found in the upper-left corner of the screen
iii.The Visit Date is the date of service of the audited encounter.
iv.The Audit Date is the actual date the audit was performed. Intelicode automatically stores the date each audit is performed.
v.Select which criteria you want to filter with by clicking on Visit Date or Audit Date in the upper-left corner.
vi.The date fields, which are located directly below the Visit Date / Audit Date toggle buttons, correspond with whichever type of date is selected.
vii.For example, if Visit Date is selected and the date boxes display "7/19/2010" and "7/19/20", the encounters displayed in the grid will be only those encounters with a visit date (service date) between those two dates.
viii. Of course, the same applies to Audit Date. When the Audit Date button is selected, the date range displayed in the date field will control the encounters displayed by their actual date of audit.
b.Status:
i.This represents whether the patient is a New patient or an Established patient.
ii.The Status filter is located just below the Visit Date / Audit Date filters on the left side of the screen.
iii.To filter by Status, click on the drop down box and then click on the appropriate Status.
c.Var:
i.This filter will allow you to display only those visits that have a certain Variance between the provider code and the auditor code.
ii.The Var filter is located just below the Visit Date / Audit Date filters on the left side of the screen.
iii.To filter by Variance, click on the drop down box and then click on the appropriate Variance.
d.Billed E & M:
i.This filter will allow you to display only those visits that have a certain Billed E & M code.
ii.The Billed E & M filter is located just below the Visit Date / Audit Date filters on the left side of the screen.
iii.To filter by Billed (Provider) E & M code, click on the drop down box and then click on the appropriate code.
e.Attending/Requesting Provider:
i.These filters will allow you to display only those visits that have a certain Provider.
ii.The Provider filters are located just below the Status, Var, and Billed E & M filters on the left side of the screen.
iii.To filter by Provider, click on the drop down box and then click on the appropriate Provider.
iv.The providers available for this field are those you have previously added to your Provider fields on the Patient screen.
f.Specialty / Sub Specialty:
i.This filter will allow you to display only those visits that have a certain Specialty or Sub Specialty of the providers who performed the encounters/visits.
ii.The Specialty / Sub Specialty filter is located just below the Provider filter on the left side of the screen.
iii.To filter by Specialty or Sub Specialty, click on the drop down box and then click on the appropriate Specialty or Sub Specialty.
g.Service Category:
i.This filter will allow you to display only those visits that have a certain Service Category that was chosen on the Patient screen.
ii.The Service Category filter is located just below the Specialty / Sub Specialty filter on the left side of the screen.
iii.To filter by Service Category, click on the drop down box and then click on the appropriate Service Category.
h.Note Macro:
i.This filter will allow you to display only those visits that contain a certain Note Macro within the Notes field.
ii.The Notes Macro filter is located just below the Service Sub Category filter on the left side of the screen.
iii.To filter by Note Macro, click on the drop down box and then click on the appropriate Note Macro.
iv.The Macros available for this filter are those you have previously added to the Note Macros Management screen.
v.When you select a visit, the Notes associated with that encounter are displayed in the white box at the bottom of the screen.
i.Reviewer / Auditor:
i.This filter will allow you to display only those visits that were audited by a certain Reviewer / Auditor.
ii.The Reviewer / Auditor filter is the last drop down box on the left side of the screen.
iii.To filter by Reviewer / Auditor, click on the drop down box and then click on the appropriate Reviewer / Auditor.
j.Clear All Filters:
i.Intelicode® keeps track of your filter settings and retains them even after you have exited the software and returned.
ii.However, if you would simply like to set the filters back to their default settings, click the Clear All Filters button.
Copyright © 1998-2026 Technology Solutions, Inc. All rights reserved.
INTELICODE® is a registered trademark of Technology Solutions, Inc. (TSI). All Rights Reserved.