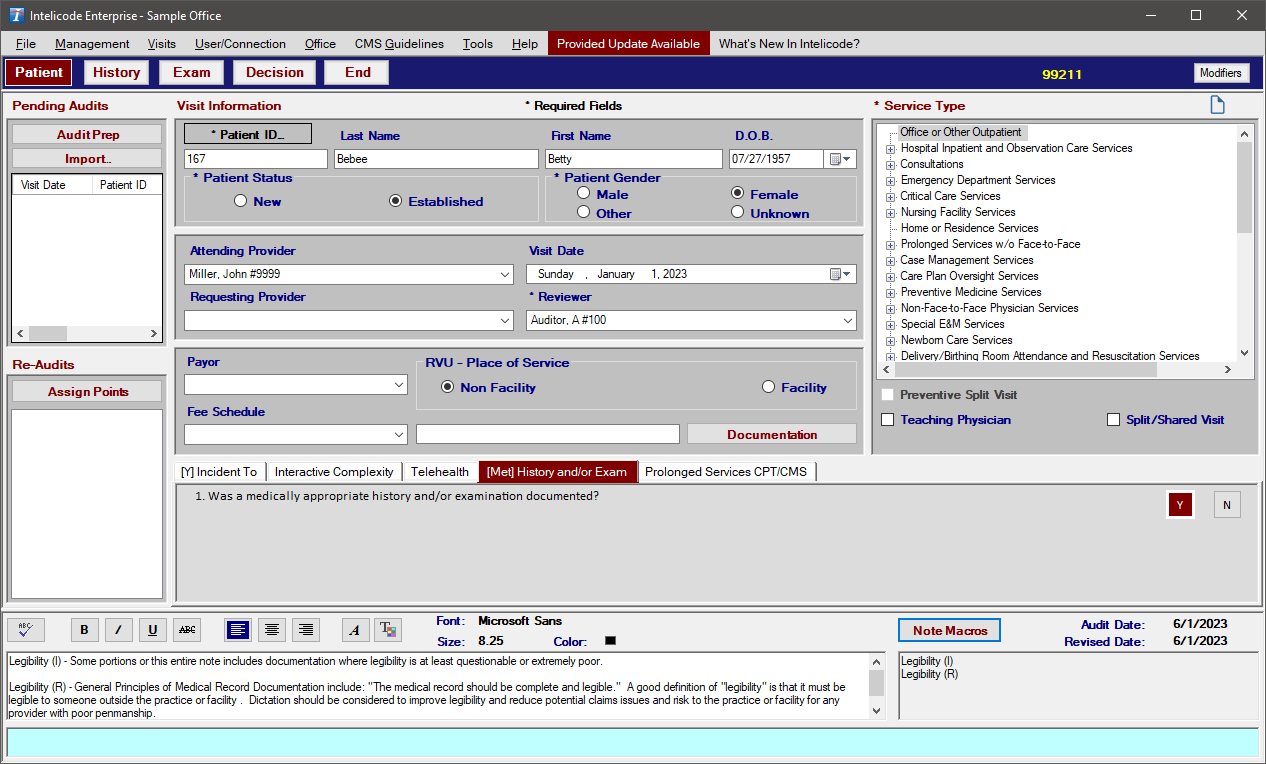
This topic will show you a walkthrough of INTELICODE® as we go through an audit, step by step. Once you have opened your Intelicode® program and logged in as a user, you will see a blank Patient screen. Please note that the field names followed by an asterisk (*) are required fields.
Patient Screen
1.To begin an audit, in the Patient ID* field, you must enter a number, letter, symbol, or combination of earlier mentioned by which you can identify the patient (i.e. medical record number, account number, etc.). The Patient ID we have entered for our audit (see below) is "167".
2.The First Name and Last Name fields can then be completed with the patient's name. Completion of the First Name and Last Name fields is not required to complete an audit. Any names entered in these fields will appear on reports exactly as they are entered here. The patient First Name and Last Name we have entered for our audit is "Betty" and "Bebee".
3.The D.O.B. (Date of Birth) field is only required for those services that are age-driven, such as "Preventive Medicine Services". If a date of birth is entered, enter it in the MM/DD/YYYY format. You may also enter the date of birth by clicking on the drop down arrow and selecting the date from the calendar display. The patient D.O.B. we have entered for our audit (see below) is 07/27/1952.
4.Choose the Patient Status* to indicate if the patient is new or established. The Patient Status we entered for our audit (see below) is "Established".
5.Choose the patient's Gender to indicate if the patient is male or female. The patient Gender we entered for our audit (see below) is "Female".
6.Select the Attending Provider (physician performing the visit) for the encounter being audited. If the attending provider is not listed, select Add New Provider from the drop down list. See Attending Providers for help. The Attending Provider we entered for our audit (see below) is "Miller, John #9999".
7.Enter the Visit Date (the date of service) by entering the date in MM/DD/YYYY format, or by clicking on the drop down arrow and selecting the appropriate date from the calendar display.
8.Enter the Requesting Provider as necessary in relation to the services being provided. If the requesting provider is not listed, select Add New Requester to add the provider to the database. See Requesting Providers for help. We did not enter a Requesting Provider for our audit (see below) since the service type was "Office or Other Outpatient".
9.Select the appropriate Service Type (i.e. office visit, consult, etc.) for the encounter being audited. Next, select the appropriate service Sub Category (i.e. initial visit, office consultations, initial hospital care, etc.). The Service Type we entered for our audit (see below) is "Office or Other Outpatient, and the service sub category we entered was "Established Patient".
Note: If the Consultations Service Type is selected, the Consult Verification questions must be answered and requirements met to continue with the audit, unless otherwise set in Preferences.
10. Select the Payor for the encounter being audited. If the payor is not listed, select Add Payor to add the payor to the database. See the Payors page for help.
11. Select the Fee Schedule for the encounter being audited. If the fee schedule is not listed, select Add Fee Schedule to add the fee schedule to the database. See the Fee Schedules page for help.
12. Choose whether the RVU - Place of Service was a "Non Facility" or a "Facility" by clicking on the appropriate selection.
13. Answer Service Questions as appropriate. In this example, the “History and/or Exam” tab has one question which must be answered Yes to meet requirements for a code higher than 99211.

Copyright © 1998-2026 Technology Solutions, Inc. All rights reserved.
INTELICODE® is a registered trademark of Technology Solutions, Inc. (TSI). All Rights Reserved.