Patient Screen |
  
|
Patient Screen |
|
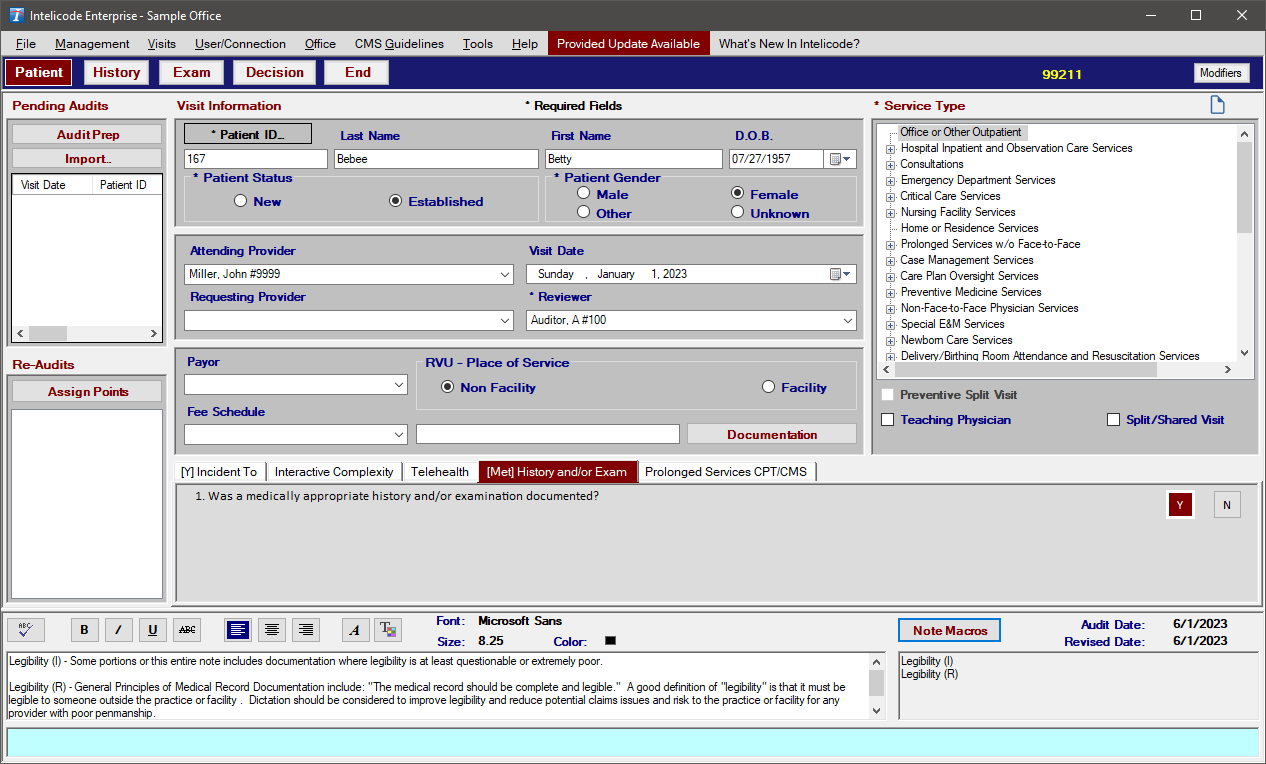
This page describes the various elements of the Patient Screen.
1.Patient ID: This field is required to generate an audit. The Patient ID can be the patient's medical record number or any other unique number, letter, symbol, or any combination by which the auditor could identify the encounter being audited.
2.First/Last Name: Patient names are optional fields and are not required to generate an audit.
3.D.O.B.:
a.This field is only required to generate an audit if the services are those that are dependent upon the age of the patient (e.g. preventive services).
b.You can select the Date of Birth from a calendar by clicking on the arrow on the right side of the text box, or you can type it in.
4.Patient Status:
a.This is the status of the patient during the encounter being audited.
b.Intelicode® will load all patients as new patients the first time they are entered into the software and will subsequently default existing patients (those already loaded into the software) as established patients for any additional encounters audited.
c.This should be changed, if necessary for the encounter being audited.
5.Patient Gender: The gender of the patient can be selected by clicking on the circle next to the gender heading or by clicking on the appropriate text itself.
6.Attending Provider:
a.This is the provider who rendered service for the encounter being audited.
b.Attending Providers can be added all at one time on the Attending Providers screen or, they can be added "as needed" by clicking on the drop down arrow for the Attending Provider field.
c.Next, click on the New Attending Provider option. The Attending Providers screen will appear.
d.You may also access the Attending Providers screen by clicking on the Management menu at the very top of your screen and then selecting Attending Provider.
7.Visit Date:
a.Enter the date of service for the encounter being audited.
b.This can be done by clicking on the Month, Day, or Year with your mouse cursor and changing the value.
c.You can also click the drop down arrow to the right of the date which will display a calendar.
8.Requesting Provider:
a.This is the provider who sent the patient to the attending provider--the requester of service for the encounter being audited.
b.Requesting Providers can be added all at one time on the Requesting Providers screen or, they can be added "as needed" by clicking on the text box for the Requesting Provider field.
c.Next, click on the New Requesting Provider option. The Requesting Providers screen will appear.
d.You may also access the Requesting Providers screen by clicking on the Management menu at the very top of your screen and then selecting Requesting Provider.
9.Reviewer:
a.A Reviewer is required for each visit. The Reviewer is the individual performing the audit.
b.Each individual performing audits should be assigned an individual User ID to maintain the most accurate audit data. In a new visit, the current reviewer is the Reviewer by default.
c.If you wish to change the Reviewer, click on the text box for the Reviewer field and select the appropriate Reviewer.
10. Payor:
a.The Payor is the entity responsible for payment.
b.To choose a payor, click on the text box for the Payor field and select the appropriate payor.
c.If the payor that you are looking for is not on the list, you will need to add the payor to the Payor table. You can do this by clicking on the text box for the Payor field and selecting New Payor. The Payors screen will appear where you can add a new payor.
d.See the Payors Help page for assistance with adding a payor.
11. Fee Schedule:
a.The Fee Schedule is a table that shows and determines what the charge is for each CPT code.
b.To choose a fee schedule, click on the text box for the Fee Schedule field and select the appropriate fee schedule.
c.If the fee schedule that you are looking for is not on the list, you will need to add a new fee schedule to the Fee Schedule table. You can do this by clicking on the text box for the Fee Schedule field and selecting Add New Fee Schedule. The Fee Schedule screen will appear where you can add a new fee schedule.
d.See the Fee Schedules Help page for assistance with adding a fee schedule.
12. RVU-Place of Service:
a.The RVU-Place of Service field shows whether or not the service was provided at a Facility or Non Facility.
b.The default selection is based on the office's settings. If you wish to change it, simply do so by clicking on the text for Non Facility or Facility as appropriate.
13. Service Type and/or SubService Type:
a.Select the appropriate Service Type for the encounter being audited, based on the documentation. If the selected service type has a '+' next to it, click to expand the list. Select the most specific service type available.
14. Teaching Physician:
a.This field will be accessible only in Intelicode P.A.T.H. to indicate whether a service is a teaching visit or not.
b.If the service being audited is a "teaching visit", click the text or the check box for the Teaching Physician field to add the Teaching Physician tab to the section just below and activate the Teaching Guidelines.
c.The Teaching Physician tab displays a field for the Resident's name followed by a series of questions to determine if the encounter being audited meets the Teaching Physician Guidelines as issued by CMS.
d.The Resident field operates like the "Attending Provider" and "Requesting Provider" fields.
e.Simply click the drop down arrow in the field and choose the New Resident option. The Residents Management screen will appear. Fill in the necessary information, then click the Save and Close buttons.
f.See the Residents Help page for assistance with adding a resident.
g.The questions are answered by choosing the appropriate Y or N answer to each question.
h.Once you have started answering the questions you will see either a GC modifier which stands for “Guidelines Complete” or a GE modifier which stands for “Guidelines Exception”. All questions along with the modifier will show on reports if you have that column selected. For more information see Reports.
i.An asterisk (*) will be displayed when the Teaching Guidelines have not been met.
Note: Teaching visits with modifiers (*, GC, and GE) will be displayed in the Teaching Physician (TP) field on the Visit Summaries screen.
15. Preventive Split Visit:
a.This feature is only accessible when the Preventive Medicine Services service type is selected.
b.To audit a preventive split visit, click on the Preventive Split Visit text or checkbox. A Split Visit tab will appear in the box below with two questions to answer.
c.Upon saving the visit, you will be immediately directed to the patient screen where you can audit the second portion of the split visit.
16. Split/Shared Visit:
a.This feature is accessible for service types other than Consultations.
b.Upon checking the Split/Shared Visit box, a new tab Split/Shared tab will appear below.
c.The Split/Shared tab allows selection of an additional provider and includes questions to verify whether CMS Split/Shared rules are being followed.
d.If the Split/Shared requirements are met, the FS modifier will be automatically added to the Reviewer E/M code.
17. Incident To: To answer questions regarding the "Incident To Requirements", see the Incident To (IT) tab toward the bottom of the screen.
18. Audit Date: This is the date that the audit took place. It is filled in automatically.
19. Revised Date: This is the last date that this audit was revised. It is also populated automatically.
20. Notes & Note Macros:
a.The left side text box (Notes) allows the user to add his/her own comments (free text) about the encounter, or the documentation, etc. for future reference or educational opportunities.
b.To change the appearance of your notes or to check your spelling, use the buttons available just above the Notes text box. It is recommended that only text be put into this box. Please do not put in tables or images in the Notes field. Font selections will be automatically saved and used for new visits.
c.The Note Macros button allows the reviewer to store specific notes for repetitive use in future audits. Using Note Macros can save the reviewer the time and effort of typing the same exact information over and over.
d.When you add a Note Macro it will add it to both the Notes and Note Macros sides. This will ensure the integrity of the original Note Macro on the right side and still allow you to make notes with the Macro on the left side.
e.For additional instructions on how to use the Note Macros section (which is available from many screens), see the Note Macros help page.
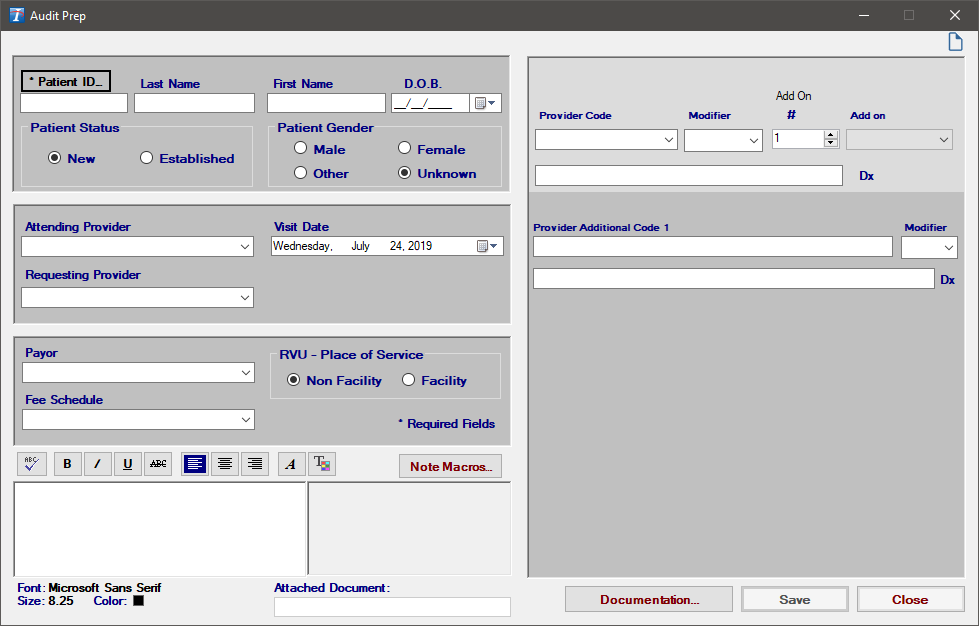
20. Audit Prep:
a.If you want to "pre-enter" information to prepare for an upcoming audit, click on the Audit Prep button in the Pending Audits section toward the upper-left portion of the Patient screen.
b.Fill in the desired information.
c.Click Save to save the audit prep data. The Pending Audits box will show the audit prep data saved by Patient ID.
d.Click Cancel to close the Audit Prep screen without saving any information.
e.If you wish to import your audit prep data from a CSV (Comma Separated Values) file, click on the Import button and browse to the file, select the file, and click Open.
f.If you have questions about importing an Audit Prep, see Importing Audit Prep help page.
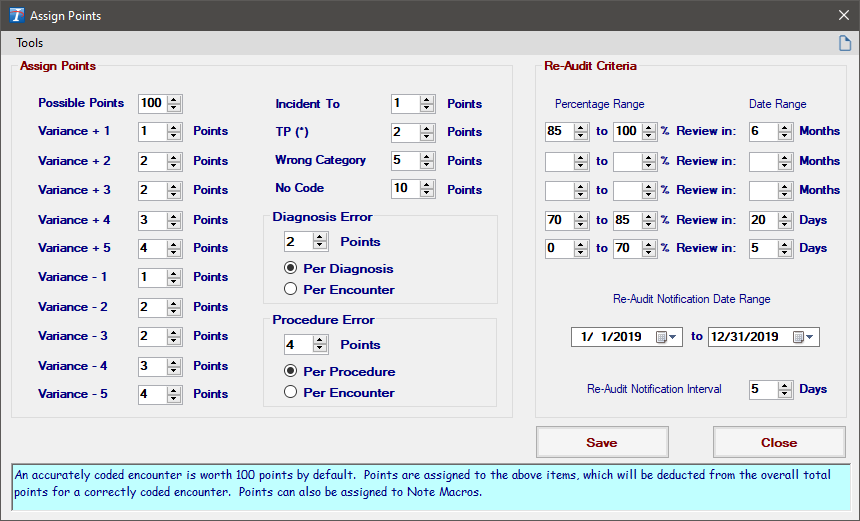
21. Assign Points:
a.To Assign Points and to set Re-Audit Criteria, click on the Assign Points button in the Re-Audits section.
b.On the left side of the screen, enter the number of possible points per encounter and the number of points to be deducted for each item.
c.Then enter the Re-Audit Criteria by clicking on the appropriate dropdown arrows to select the percentage or click on the textbox itself and type in the percentage.
d.To select the dates between which you would run re-audit notification for, click on the dropdown arrows just below the Re-Audit Notification Date Range heading to select the dates from the calendar, or you can also type the dates in.
e.You can determine how often you would like the re-audit notification to occur. Click on the dropdown arrow just to the right of the Re-Audit Notification Interval heading to select the number of days or click on the textbox itself and type in the number.
f.You can copy these settings from another office or send them to other offices using the Tools menu.
22. Provided Database Update Notification:
a.When update notifications are enabled, a red menu item will appear if a Provided Database update is available.
b.Clicking this button will display a summary of changes.
c.Users with a local SQL database will be able to update automatically, which will restart Intelicode afterward.
23. What's New in Intelicode?:
a.When the Show “What’s New In Intelicode?” Notification option is enabled in preferences, this menu item will be shown after updating Intelicode.
b.Clicking this will display information about recent Intelicode updates, including a link to an “Overview of Changes” document with additional details.
c.This function is available at any time through the Help menu.
Copyright © 1998-2026 Technology Solutions, Inc. All rights reserved.
INTELICODE® is a registered trademark of Technology Solutions, Inc. (TSI). All Rights Reserved.