Risk Elements |
  
|
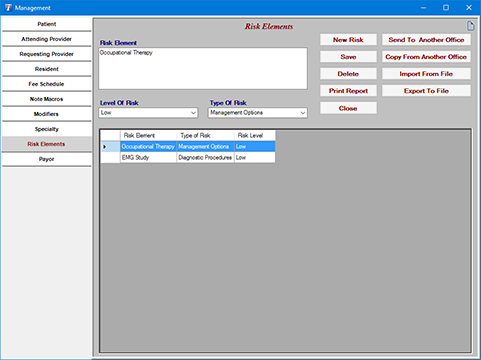
Risk Elements |
|
1.Add a New Risk Element:
a.Click on the New Risk button.
b.Click on the text box just below the Risk Element heading.
c.Type in the Risk Element.
d.To choose the Level of Risk click on the drop down box just below the Level of Risk heading.
e.Click on the Level of Risk in the list.
f.To choose the Type of Risk click on the drop down box just below the Type of Risk heading.
g.Click on the Type of Risk in the list.
h.Save the new Risk Element by clicking on the Save button.
2.Select Records:
a.To select one Risk Element record, click anywhere on the row in the table.
b.To select multiple records that are contiguous within the current table display, click on the first record, then hold down the Shift key, and select the last record in the range.
c.To select multiple records that are not contiguous within the current table display, click on the first record, then hold down the Ctrl key while selecting the other records that you want selected.
3.Delete Risk Elements:
a.Select the Risk Element record(s) you wish to delete.
b.Click the Delete button.
4.Edit a Risk Element:
a.Select the Risk Element record you wish to edit by clicking anywhere on the Risk Element's row in the table.
b.To change the data, click on the text box corresponding to the field that needs to be changed, then change the text as appropriate.
c.To change the Level Of Risk or Type Of Risk, click on the corresponding drop down box and select a different option.
d.Save your changes by clicking on the Save button.
5.Print a Report: See the Management Reports help page for instructions on how to print a report.
6.Search: Click on the long search text box and begin typing your search. Once you finish typing, Intelicode® will display only the matching Risk Elements.
7.Send to Another Office:
a.Select the Risk Element record(s) that you want to be sent (copied) to the Risk Element table in another office(s).
b.Click the Send to Another Office button. The Pick Office(s) pop-up window will appear.
c.Select the office(s) that you would like to send this record(s) to.
d.Click OK to send the record(s). The Risk Elements remain in this office and are now copied to the Risk Element table in the other office(s) selected.
e.If there is a Risk Element from the selected office(s) that is the same as a Risk Element from the data you are sending, you will be asked if you want to overwrite:
i.The All option will tell Intelicode® to overwrite any and all Risk Element records (from this point forward in this process) in the selected office(s) that have a Risk Element that matches a Risk Element in the data you are sending.
ii.The None option will tell Intelicode® to not overwrite any Risk Element records for this particular copy from this point forward in this process.
iii.The Yes option will tell Intelicode® to overwrite this one particular Risk Element record and only this record.
iv.The No option will tell Intelicode® to not overwrite this one particular Risk Element record and only this record.
v.The Cancel option will stop the entire Send process.
8.Copy From Another Office:
a.Click the Copy From Another Office button.
b.Select the office(s) from which you wish to copy all of its Risk Element records.
c.Click OK.
d.The Risk Element records from the office(s) you selected are now a part of your current office's Risk Element table.
e.If there is a Risk Element from the selected office(s) that is the same as a Risk Element from your current Risk Element table, you will be asked if you want to overwrite:
i.The All option will tell Intelicode® to overwrite any and all Risk Element records (from this point forward in this process) that have a Risk Element that matches a Risk Element in the data you are copying.
ii.The None option will tell Intelicode® to not overwrite any Risk Element records for this particular copy from this point forward in this process.
iii.The Yes option will tell Intelicode® to overwrite this one particular Risk Element record and only this record.
iv.The No option will tell Intelicode® to not overwrite this one particular Risk Element record and only this record.
v.The Cancel option will stop the entire Copy process.
9.Import From File:
a.You can import Risk Elements from a Microsoft Excel Spreadsheet (.xsl, .xslx), or from a Comma Separated File.
b.Click on the Import From File button. The Open window will pop up.
c.Browse to the location of the file you wish to import.
d.Using the drop down box in the lower-right portion of the Open window, choose the file type of the file you wish to import.
e.Next, select the file by clicking on it.
f.Click the Open button to import the file.
g.You will be asked the question, "Does this file have headers?" If the top row in your spreadsheet or CSV file is made up of column headings, click Yes. Otherwise, click No
h.If you clicked Yes, you will next have the opportunity to match up the fields in your file to the static Risk Elements table fields. Read the text in the light blue box at the bottom of the Import Fields window for further instructions. Click OK when you are confident that the fields are matched up properly.
i.If you clicked No, you will need to match the column name to the column in your data. You can do this by right-clicking on a field and matching it up to the number of the order in which it appears in your data. The order begins with "0".
j.Your imported data will appear in the table.
k.If you have questions about importing Risk Elements, see Importing Risk Elements help page.
10.Export to File:
a.If you'd like to export your Risk Element table to a Comma Separated Values (.csv) file, click the Export To File button.
b.Browse to the location in which you would like to save your exported CSV file.
c.Type in a file name for this file in the text box to the right of the File Name heading toward the bottom of the window.
d.Click Save to save the CSV file.
11. When you are finished with the Risk Elements screen, click on a different maintenance table from the menu on the left side of the screen or click Close to close the Management screen.
Copyright © 1998-2026 Technology Solutions, Inc. All rights reserved.
INTELICODE® is a registered trademark of Technology Solutions, Inc. (TSI). All Rights Reserved.